
So, you’ve set up your Amplify project, users started signing up in droves using the handy authenticator component provided by amplify-ui, and life was great … until user complaints started rolling in.
“I forgot my username and can’t get into my account!”
Darn. The username sign in workflow for Amplify leaves a lot to be desired. If someone forgets their username, there is currently no client supported way offered by Cognito to change it or access it (but you can bug the Amplify team to implement it here: https://github.com/aws-amplify/amplify-js/issues/5851 (: ). This means that many users could just get frustrated and leave your app all together.
But there is a solution! You could migrate to a new Cognito user pool that authenticates by email instead. Users are much less likely to forget their email, right?
A short Google search later, it appears that AWS recommends two approaches to migrating user pools. You can import users into a user pool with a Lambda trigger migration, or you can bulk upload users into a new pool for a CSV file.
Each method has their own list of pros and cons, but the main question to guide your decision boils down to this: Do you want your users to be able to keep their passwords without having to reset them? If the answer is yes, you’ll have to go with the user migration Lambda trigger, and this guide won’t be of much use to you.
However, if you are in the same boat I was in when performing this migration, meaning you don’t mind your users resetting their passwords, and you don’t want another Lambda function floating around in the cloud that you have to pay for and maintain over time (a.k.a. balling on a budget), then read on!
Fair warning, the CSV bulk upload method at first glance seems deceptively easy to implement, but it can be a bit involved. Luckily, I have put in the leg work to streamline this process as much as possible to get your application back up and running!
Before we jump in to how to migrate your users over to a new and improved user pool, a couple notes:
- I have provided a Github repo with all the scripts that I used along the way to make my life much easier in this migration. I will be referring to them throughout this post, and they can be found here: https://github.com/1904labs/amplify-cognito-migration-utilities
- This process took me about 1 hour and 37 minutes to complete with all the amplify updates I had to do. This is a reflection of how long the process may take you.
Let’s Get Started
Before diving in too deeply, it is important to note that this process requires removing your current Auth module in Amplify. This means that all of the user data present in that Cognito pool will be deleted by the end of this process, so take as many backups as you need to avoid future heartache. We will be using the CSV exporter provided in Github to download our users as a csv file.
Step 1: Prepare your environment for the migration
You must remove all dependencies of the current Auth module. In my particular case, I had 2 Amplify functions (Lambdas) that had an Auth dependency. I ran the command `amplify update function` to edit the resource configuration of these lambdas and temporarily remove the Auth dependency. You will have to do this for every piece of your Amplify app that depends on Auth in order to delete it.
Step 2: Export all users from your current Cognito pool to a CSV file
Cognito documentation states that the service supports importing users through CSV files. However, they do not provide an easy tool for doing this. Inside the Github repo I have prepared, you will see a script called cognito-csv-exporter.js that will help you generate this user CSV file.
First things first, we need to create a user pool that will model the attributes your production pool will contain by the end of this post. So navigate to the AWS console, click “Create User Pool”, then choose the Cognito user pool sign-in options that you would like to apply. Again, this pool will eventually be deleted so do not worry too much about the settings.

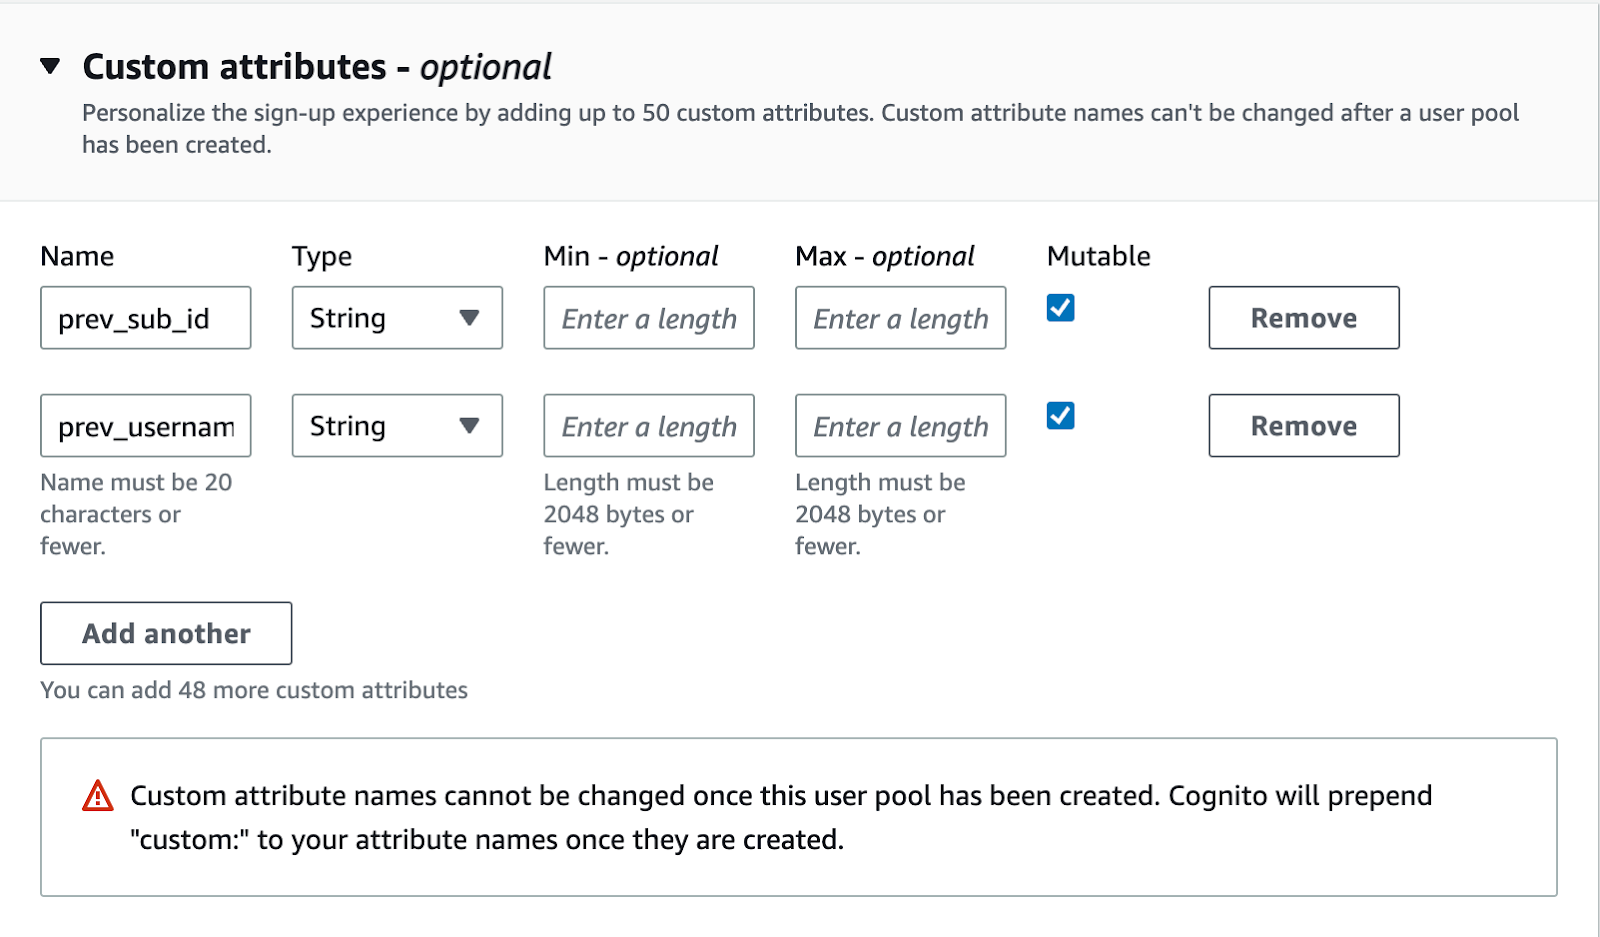
Eventually there will be an accordian titled “Custom Attributes - optional”. Here is where we want to create at least 2 custom attributes to save the data that will be lost from migrating pools. Feel free to create more custom attributes based on your needs.
The first custom attribute we will add will be of type String and will be prev_sub_id to keep track of the old pools assigned sub ID.
The second custom attribute we will add will be of type String and will be prev_username to keep track of the old pools assigned username.
Once these attributes have been created, you can finish setting up the pool to meet your use case.
Now that you have a model user pool set up, it will contain the CSV headers we need to transfer our users from the current pool to a CSV document.
Open up the provided cognito-csv-exporter.js file and edit the USER_POOL_ID_FOR_CSV_HEADERS variable to contain the new user pool ID you just created. Next, change the USER_POOL_ID_CONTAINING_USERS_TO_MIGRATE variable to reflect the user pool ID of the pool you are wanting to migrate from.
Next, run `node scripts/cognito-csv-exporter.js` which will generate a CSV file in the format that Cognito requires for bulk uploads.
A couple of gotchas to watch out for:
- If you are migrating user pools to use email instead of username be aware that whatever is being used to log in must be unique. So if you have users with different usernames but the same email address in your old pool, you will have to remove one of these duplicate email users to pass Cognito’s bulk upload validation.
- Users must have the email_verified attribute set to true to bulk upload them to another user pool and pass Cognito’s validation. This means users who have not verified their email on initial account creation must either be deleted, or automatically updated to contain true for this attribute.
Step 3: Configure Amplify to use a new Cognito pool
Warning: This step will result in losing access to your current existing Cognito pool housing your users. Make sure you back this data up if you need to access it later on down the road, and the CSV we created together through this guide does not meet your needs.
First run `amplify status` to view what environment you are currently in. If you are not in the correct environment you want to migrate from, use `amplify env checkout` to switch to it.
Now that you have verified you’re in the correct environment, you will want to remove the link between your existing user pool and your amplify project. This is as simple as running `amplify remove auth`. Complete the CLI commands to remove the Auth Module.
Now that the Auth module is gone, you will want to `amplify add auth` to set up a new Cognito user pool. Configure the pool in a way that makes sense for your project, or you can use `amplify import auth` to link an existing pool to your Amplify project. In my project, I set this new pool up to log in with email instead of username.
Now navigate to this file:
amplify > backend > api > your_app_name > parameters.json
Inside this file, you will want to find this object:
"AuthCognitoUserPoolId": {
"Fn::GetAtt": [
"authexamplePool37482u8f",
"Outputs.UserPoolId"
]
},
And change the 0 index item of Fn::GetAtt to be the word “auth” and your new pool you just created.
You can run `amplify status` to see the name of the new pool you just created.
Take that name and paste it after the word auth to look like this: “authmypoolname123”. Then save the file.
Now you are ready to run `amplify push`. This will delete your old user pool automatically and set the new pool as your primary Auth configuration.
Step 4: New pool updates and preparing for data updates
Navigate to the new pool you created in step 3 and set up the custom attributes to use prev_sub_id and prev_username.
Now you are ready to prepare your data for the migration.
In my project, I had 3 types that relied on the sub ID of the Cognito user. These were as follows:
- User
- Vehicle
- Receipt
Since each user would be receiving a new Cognito sub ID, my DynamoDB records would no longer point to the new user as the owner. So to prevent this, we must run a script that updates each record in the corresponding tables to find the new user by matching the DynamoDB’s userID field with the custom:prev_sub_id on the new Cognito user.
However, before doing this, we must make sure that each record has a field called userID with the correct sub ID to run this script on.
I made sure each of my Types in my schema.graphql file had these auth configurations:
{
allow: owner
provider: userPools
identityClaim: "sub"
ownerField: "userID"
operations: [create, read, update, delete]
}
This just makes sure that whatever Cognito user is accessing this type through AppSync is considered the owner if their subID matches the userID field on the record.
If each of your records you need to update has a userID field already then great news, you can skip this step! But if your records do not, you will need to write a script updating this field to contain the correct owner's sub ID.
Step 5: Performing the migration
Go into your new user pool, navigate under Import Users, click “Create Import Job”, and upload your CSV file with your user base.
Congratulations, your users have successfully migrated!
Now you can utilize the repo I provided to run the updateTablesToNewUsers.js script to fill in the dynamo records with the new sub IDs of the freshly created Cognito pool. This will make sure that the owner of the field is updated to utilize the new user’s sub ID and nothing is lost on their part.
Congratulations, you have successfully migrated your data and can continue on your Amplify journey!
Questions? Hit me up on LinkedIn www.linkedin.com/in/ryan-talbert


